Conducting a Gage R&R Minitab Study (Explained with a Practical Example)

Simon Föger
In the previous blog post about Test Method Validation, we already discussed different types of Test Method Validations, depending on the type of data and whether the test method is destructive or not.
This blog is about a variable, non-destructive test method, e.g., measuring an injection molded part.
This type of Test Method Validation (TMV) is known as Gage R&R and might be the best way to show what TMV is all about.
Why You Should Perform an IQ Before Doing a Gage R&R Study
The equipment and fixtures used during the test method shall have an Installation Qualification (IQ) performed, the software, including the spreadsheets for calculations, shall be validated [1].
The GHTF defines Installation Qualification (IQ) as follows [3]:
“establishing by objective evidence that all key aspects of the process (here test) equipment and ancillary system installation adhere to the manufacturer’s approved specification and that the recommendations of the supplier of the equipment are suitably considered.”
So, an IQ basically asks whether the equipment is installed correctly.
However, installed correctly also means that the equipment has been “installed” within your Quality Management System (QMS), e.g., preventative maintenance, calibration, and other relevant subsystems.
The same goes for the software and/or spreadsheets used for a test method.
Why is the Measurement Range Important When Doing a Gage R&R Study?
Let us first explain what we mean by a measurement range.
The measurement range is the range of values for which the method has been validated in terms of accuracy and precision [1].
There are two different ways to consider the measurement range in a Gage R&R:
- Only for the specification range of a particular test method.
- For multiple specification ranges.
The specification range is the design requirement that defines the allowable range within which the variable must be controlled [1].
Thus, if a test method is used for only one product requirement, the measurement range may be the specification range for that requirement.
However, if multiple requirements are to be evaluated, the measurement must encompass the specification range of all product requirements.
This may be somewhat confusing, so we recommend performing individual Gage R&R studies for individual specification ranges. This may save you a challenging argument with the auditor.
How to Approach a Gage R&R Study with Minitab?
So, we already know that we have variable data (as opposed to attribute) and that we test in a non-destructive way (as opposed to a destructive way) – that's quite a lot.
The next step is to design the Gage R&R study and decide on the number of the following three items:
- Operators (O)
- Parts (P)
- Repetitions (R)
With the number of operators (O), we can assume that the more operators we use, the better we understand possible weaknesses. At least three operators must be selected from the pool of regular operators. Each operator must then independently perform the entire test method, including any necessary preparatory steps (e.g., calibration or sample preparation) [1].
The number of parts (P) should be representative of the measurement range. In a single specification range, parts would be selected near the edges and center of the specification range [1].
The number of repetitions (R) should satisfy the following equation to ensure the precision of the measurement device is estimated to be within 25% of its actual value [1]:
R ≥ 1 + 30 / (O * P)
Example:
Three operators (O) should randomly measure ten samples (P) at least two times (R) to satisfy the above equation. Studies with 60 or more measurements should be aimed for.
Now that we know how many operators, samples, and repetitions we need, we can execute the actual measurements. The execution of the measurements should be randomized. We recommend you organize the results in the following way:

After gathering the data, use statistical software to analyze it. We proceed using Minitab as our statistical software of choice.

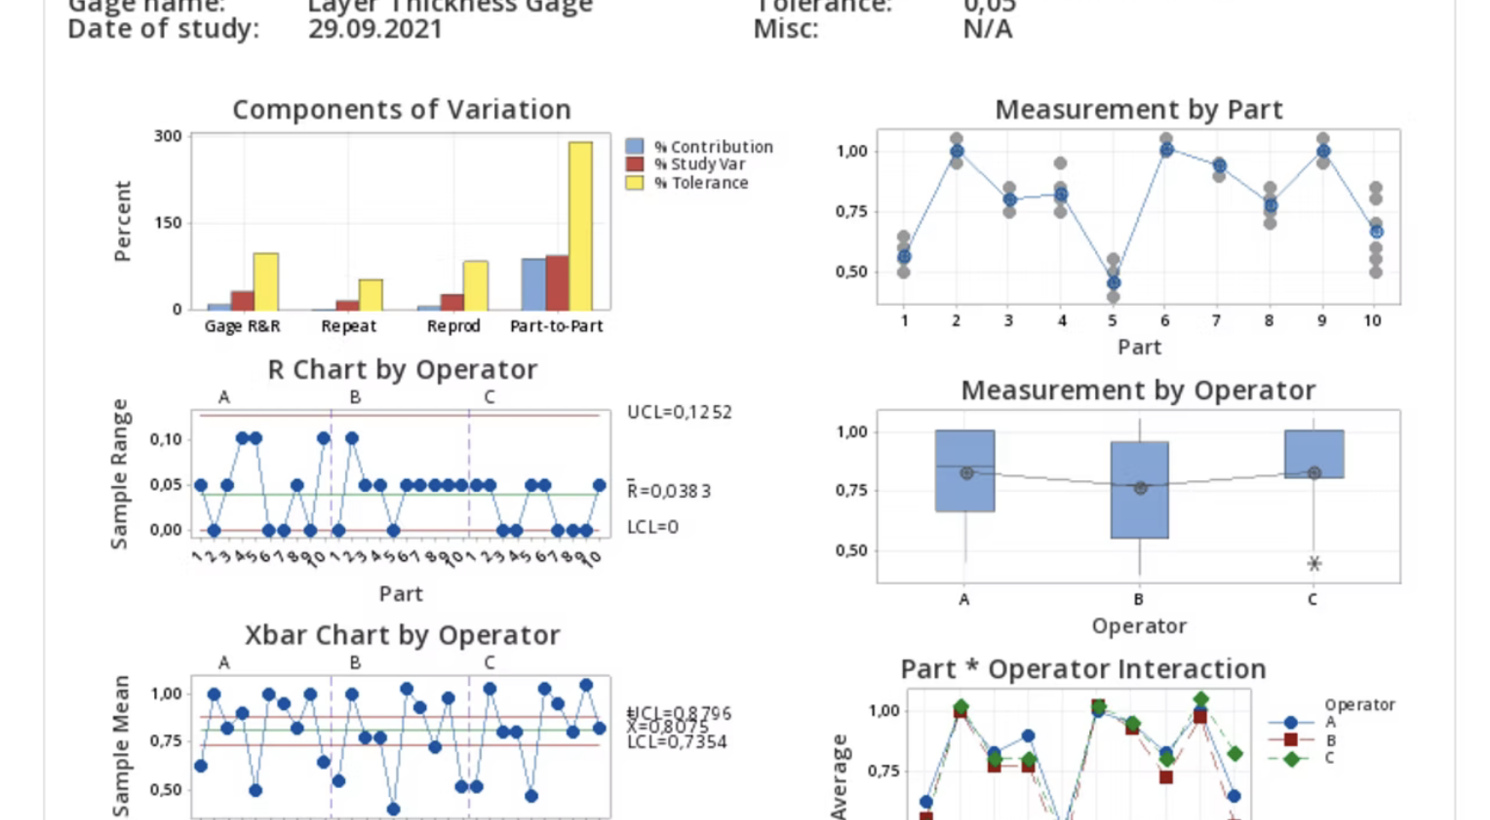
In the top right, we see the Measurement by Part graph.
This contains all measurements, and outliers would be apparent here.
We can also see in the graph below that the three operators have different means and different standard deviations, with operator C having the smallest and operator B having the most significant standard deviation.
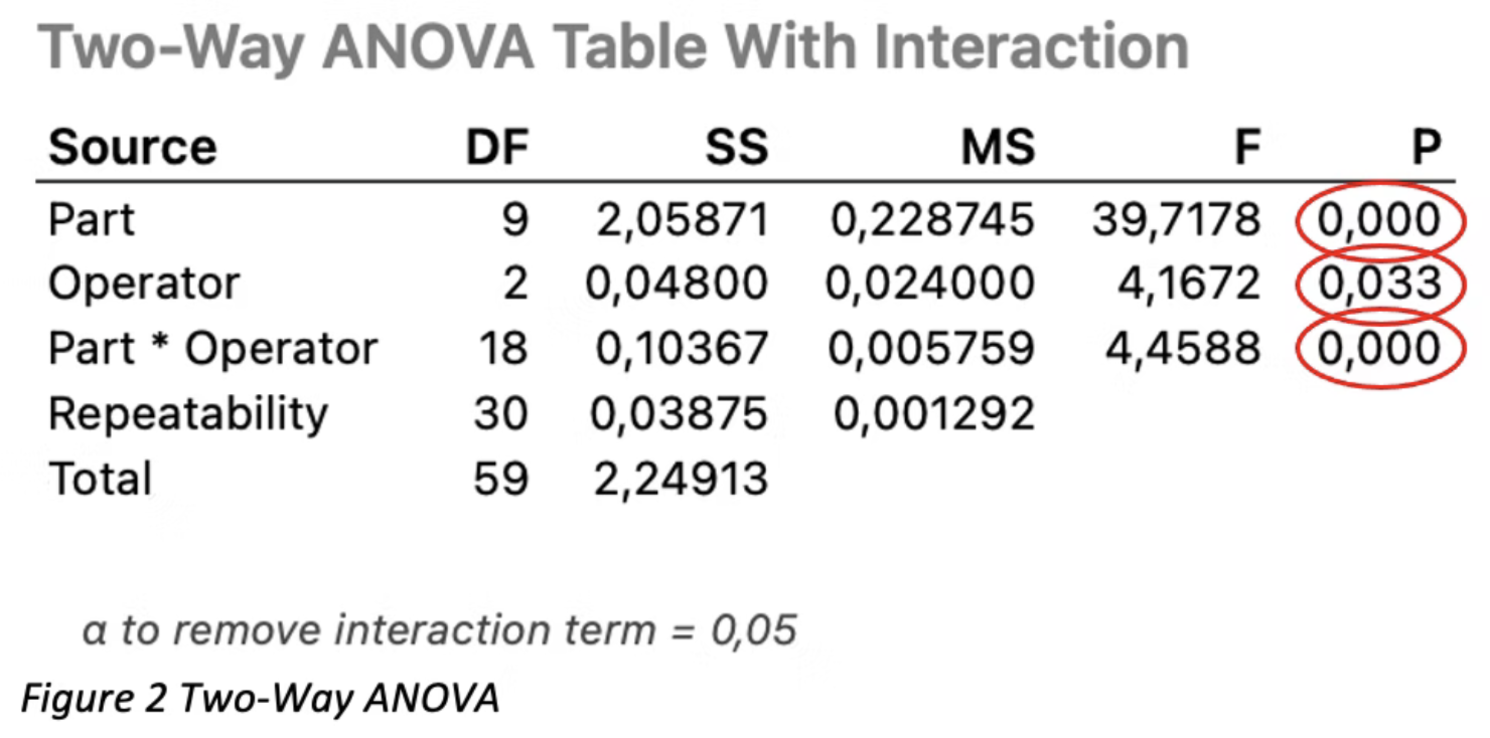
The next step is to check the ANOVA table Minitab provides.
The p-values provided are calculated for each source (Part, Operator, and Part*Operator).
All p-values small or equal to 0.05 are considered statistically significant; thus, one can assume that 95% of parts, operator, and part*operator are significant.
NOTE: statistically significant only means that there is a detectable difference, but not that this difference has any technical meaning [1].

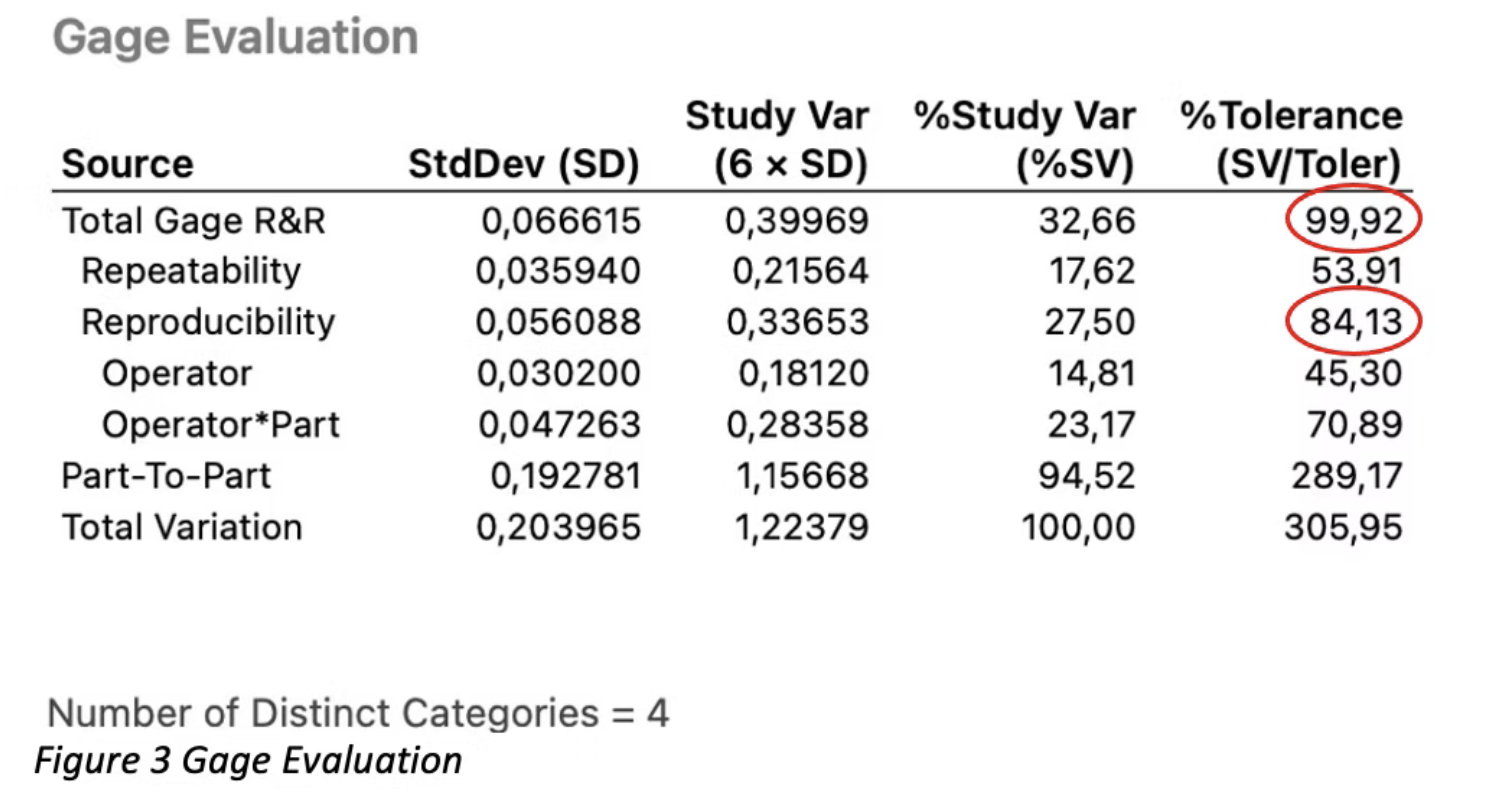
Next, we consider the Gage Evaluation provided by Minitab.
The acceptance criteria for a gage R&R study is a Total Gage R&R %Tolerance of £ 30%.
In Figure 3, the Total Gage R&R %Tolerance for this example is 99.92%, so the study failed.
In evaluating the individual Rs, it appears that the R for reproducibility is currently the largest contributor to a poor Gage R&R result.
However, even repeatability alone would not be passing.

The high value for reproducibility means that the operators have problems aligning with each other.
We already discussed this and can be seen in the Measurement by Operator graph in Figure 1.
Now that we know that we failed and where the problem is coming from, we need to improve the test method by improving reproducibility.
Further helpful links & resources:
- SIFo Medical YouTube: Short, valuable videos on Quality Management
- Free Resources: Get free access to checklists & templates
- TMV Guides: Your practical guide to perform test method validation (incl. templates & videos)
- TMV Online Course: Become an expert in Test Method Validation
- SIFo Medical Newsletter: Subscribe to our newsletter and receive information and updates straight into your inbox.
References
[1] W. Taylor, Statistical Procedures for the Medical Device Industry, Taylor Enterprises, Inc., 2017. [Online]. Available: www.variation.com
[2] Automotive Industry Action Group, Measurement System Analysis, 4th ed., 2010.
[3] Global Harmonization Task Force (GHTF), "Quality Management Systems – Process Validation Guidance", GHTF/SG3/N99-10:2004. [Online]. Available: http://www.imdrf.org/docs/ghtf/final/sg3/technical-docs/ghtf-sg3-n99-10-2004-qms-process-guidance-04010.pdf
